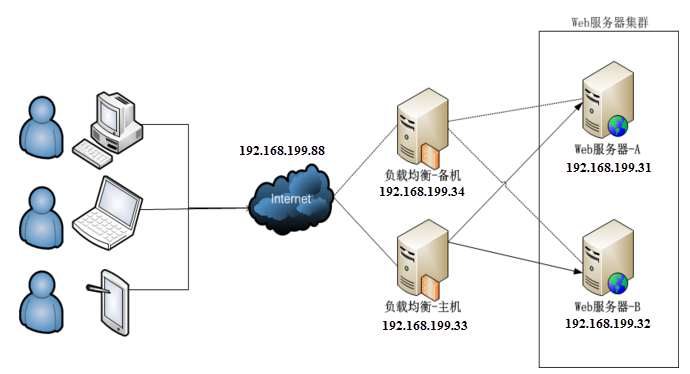
1. 简介
LVS是Linux Virtual Server的简写,意即Linux虚拟服务器,是一个虚拟的服务器集群系统。目前有三种IP负载均衡技术(VS/NAT、VS/TUN和VS/DR);十种调度算法(rrr|wrr|lc|wlc|lblc|lblcr|dh|sh|sed|nq)。
Keepalived在这里主要用作RealServer的健康状态检查以及LoadBalance主机和BackUP主机之间failover的实现。
本文我们将实现下图的实验。
2. 准备
2.1 主机列表
环境centos 6.6
| 服务器功能 |
IP |
VIP |
| Lvs MASTER |
192.168.199.33 |
192.168.199.88 |
| Lvs BACKUP |
192.168.199.34 |
192.168.199.88 |
| Web serverA |
192.168.199.31 |
192.168.199.88 |
| Web serverB |
192.168.199.32 |
192.168.199.88 |
准备工作:
2.2 关闭SELinux和防火墙
每台服务器关闭SELinux和防火墙
#setenforce 0
#service iptables stop
2.3 同步时间
每台服务器同步时间
tzselect
cp /usr/share/zoneinfo/Asia/Shanghai /etc/localtime
ntpdate -u ntp.api.bz
3. 安装配置
3.1 配置两台WEB服务器
3.1.1 开启httpd服务
#yum install httpd
3.1.2 设置访问主页
#cd /var/www/html
192.168.199.31
#vi index.html
    This is web server 192.168.199.31
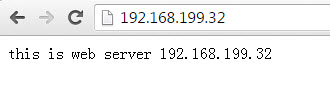
192.168.199.32
#vi index.html
    This is web server 192.168.199.32
3.1.3 编写WEB服务器启动脚本
realserver.sh
1
2
3
4
5
6
7
8
9
10
11
12
13
14
15
16
17
18
19
20
21
22
23
24
25
26
| #!/bin/bash
VIP=192.168.199.88
/etc/rc.d/init.d/functions
case "$1" in
start)
echo " start LVS of REALServer"
/sbin/ifconfig lo:0 $VIP broadcast $VIP netmask 255.255.255.255 up
/sbin/route add -host $VIP dev lo:0
echo "1" >/proc/sys/net/ipv4/conf/lo/arp_ignore
echo "2" >/proc/sys/net/ipv4/conf/lo/arp_announce
echo "1" >/proc/sys/net/ipv4/conf/all/arp_ignore
echo "2" >/proc/sys/net/ipv4/conf/all/arp_announce
sysctl -p >/dev/null 2>&1
;;
stop)
/sbin/ifconfig lo:0 down
echo "close LVS Directorserver"
echo "0" >/proc/sys/net/ipv4/conf/lo/arp_ignore
echo "0" >/proc/sys/net/ipv4/conf/lo/arp_announce
echo "0" >/proc/sys/net/ipv4/conf/all/arp_ignore
echo "0" >/proc/sys/net/ipv4/conf/all/arp_announce
;;
*)
echo "Usage: $0 {start|stop}"
exit 1
esac
|
设置可执行
#chmod +x realserver.sh
设置可读写
#chmod 755 /etc/rc.d/init.d/functions
在每台WEB服务器上执行
#./realserver.sh start
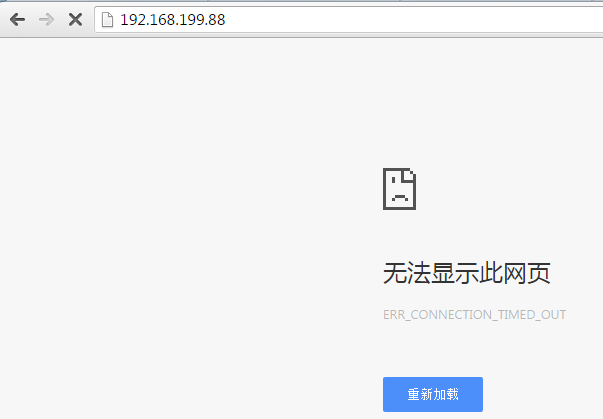
3.1.4 测试WEB服务器独立可访问

此时还不能访问192.168.199.88
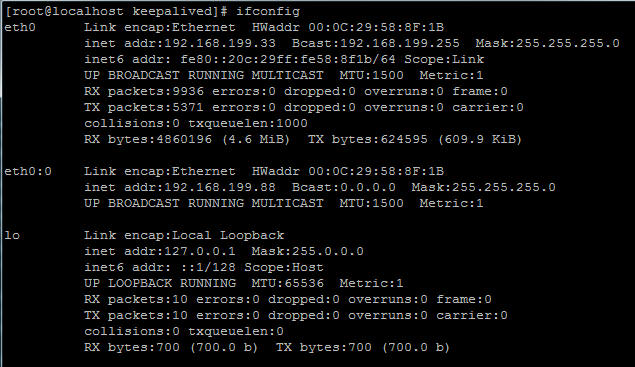
3.2 安装配置Lvs Master服务器
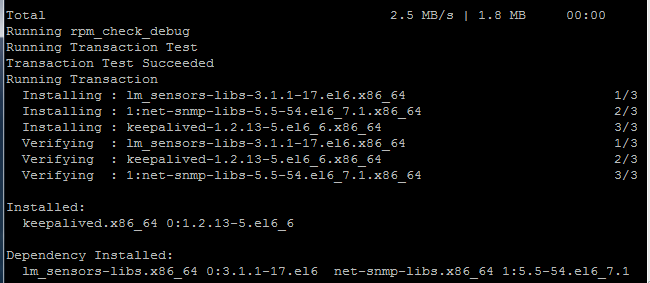
#yum install keepalived
#cd /etc/keepalived/
#cp keepalived.conf keepalived.conf.bak
keepalived.conf
1
2
3
4
5
6
7
8
9
10
11
12
13
14
15
16
17
18
19
20
21
22
23
24
25
26
27
28
29
30
31
32
33
34
35
36
37
38
39
40
41
42
43
44
45
46
47
48
49
50
51
52
53
54
55
56
57
58
| ! Configuration File for keepalived
global_defs {
notification_email {
[email protected]
[email protected]
[email protected]
}
notification_email_from [email protected]
smtp_server 192.168.200.1
smtp_connect_timeout 30
router_id LVS_DEVEL
}
vrrp_instance VI_1 {
state MASTER
interface eth0
virtual_router_id 51
priority 100
advert_int 1
authentication {
auth_type PASS
auth_pass 1111
}
track_interface {
eth0
}
virtual_ipaddress {
192.168.199.88/24 dev eth0 label eth0:0
}
}
virtual_server 192.168.199.88 80 {
delay_loop 6
lb_algo wrr
lb_kind DR
nat_mask 255.255.255.0
persistence_timeout 30
protocol TCP
real_server 192.168.199.31 80 {
weight 3
TCP_CHECK {
connect_timeout 10
nb_get_retry 3
delay_before_retry 3
connect_port 80
}
}
real_server 192.168.199.32 80 {
weight 3
TCP_CHECK {
connect_timeout 10
nb_get_retry 3
delay_before_retry 3
connect_port 80
}
}
}
|
#service keepalived start
3.3 安装配置Lvs Backup服务器
#yum install keepalived
#cd /etc/keepalived/
#cp keepalived.conf keepalived.conf.bak
keepalived.conf
1
2
3
4
5
6
7
8
9
10
11
12
13
14
15
16
17
18
19
20
21
22
23
24
25
26
27
28
29
30
31
32
33
34
35
36
37
38
39
40
41
42
43
44
45
46
47
48
49
50
51
52
53
54
55
56
57
58
59
60
| ! Configuration File for keepalived
global_defs {
notification_email {
[email protected]
[email protected]
[email protected]
}
notification_email_from [email protected]
smtp_server 192.168.200.1
smtp_connect_timeout 30
router_id LVS_DEVEL
}
vrrp_instance VI_1 {
state BACKUP
interface eth0
virtual_router_id 51
priority 99
advert_int 1
authentication {
auth_type PASS
auth_pass 1111
}
track_interface {
eth0
}
virtual_ipaddress {
192.168.199.88/24 dev eth0 label eth0:0
}
}
virtual_server 192.168.199.88 80 {
delay_loop 6
lb_algo wrr
lb_kind DR
nat_mask 255.255.255.0
persistence_timeout 30
protocol TCP
real_server 192.168.199.31 80 {
weight 3
TCP_CHECK {
connect_timeout 10
nb_get_retry 3
delay_before_retry 3
connect_port 80
}
}
real_server 192.168.199.32 80 {
weight 3
TCP_CHECK {
connect_timeout 10
nb_get_retry 3
delay_before_retry 3
connect_port 80
}
}
}
|
#service keepalived start
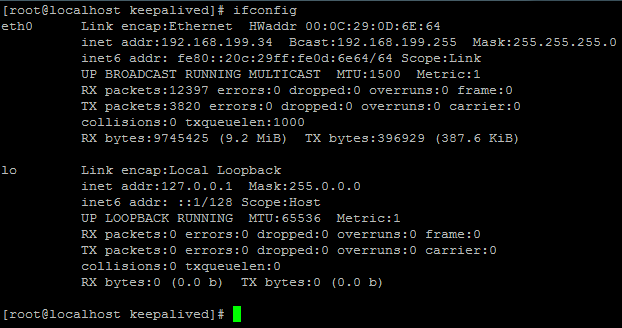
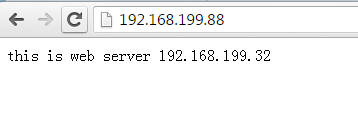
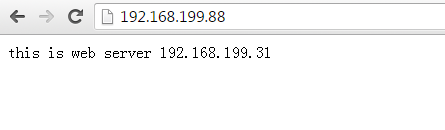
访问192.168.199.88, 访问正常,一段时间会自动切换web服务器
4. 实验
4.1 实验1
将WEB服务器31停止,看访问是否还是正常。
#service httpd stop
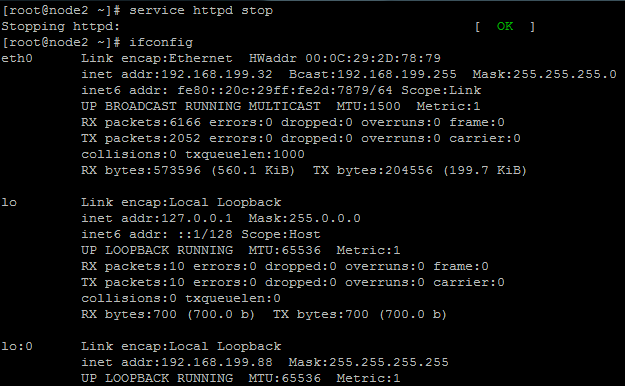
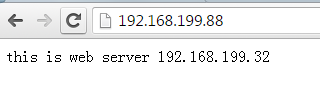
我们看到还能正常访问,只是切换到WEB服务器B
4.2 实验2
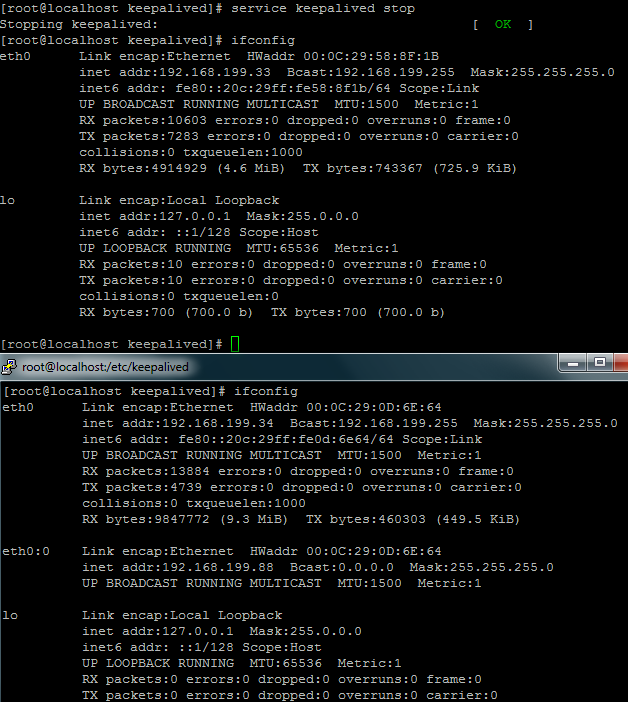
将负载均衡服务器master停止,看访问是否还是正常。
#service keepalived stop
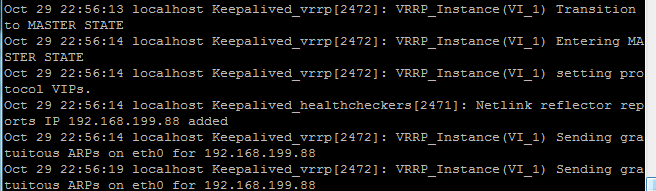
我们可以从master服务器的LOG可以看到,VIP192.168.199.88已释放。
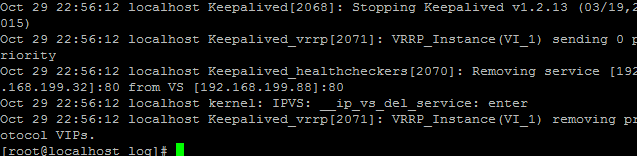
我们可以从BACKUP服务器的LOG可以看到,BACKUP服务器已接管VIP192.168.199.88
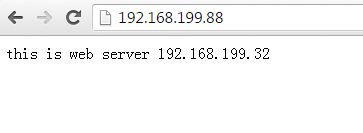
访问192.168.199.88还是正常
至此使用Keepalived实现将lvs进行高可用成功部署。